Navigation Mesh & Collision Mesh
The Navigation Mesh (Nav Mesh) Element determines where avatars can walk and how objects interact within a scene. It consists of:
- Navigation Mesh (Nav Mesh): Defines walkable areas (shown in blue when selected).
- Collision Mesh: Defines how objects collide with the scene (shown in red or yellow, depending on the type).
A well-configured Nav Mesh is essential for fluid movement, realistic interactions, and smooth navigation in the Metaverse.
Navigation Mesh Generation
When you click Regenerate or Publish your scene, XR Creator Studio generates the Nav Mesh using the following process:
- XR Creator Studio combines all the walkable geometry into one large mesh.
- XR Creator Studio voxelizes the mesh (similar to a Minecraft landscape), where the size of the voxels is defined by the cell size and cell width.
- Higher-resolution voxels produce a more accurate Nav Mesh, but require more processing power.
- The system computes walkable areas using these voxels.
- Fine-tuning parameters can improve navigation, especially in complex environments.
🔹 Pro Tip:
🔹 If your Nav Mesh is not regenerating properly, reduce the cell size to 0.1m and increase if processing takes too long.
🔹 Adjust step height and slope for better stair or ramp movement.
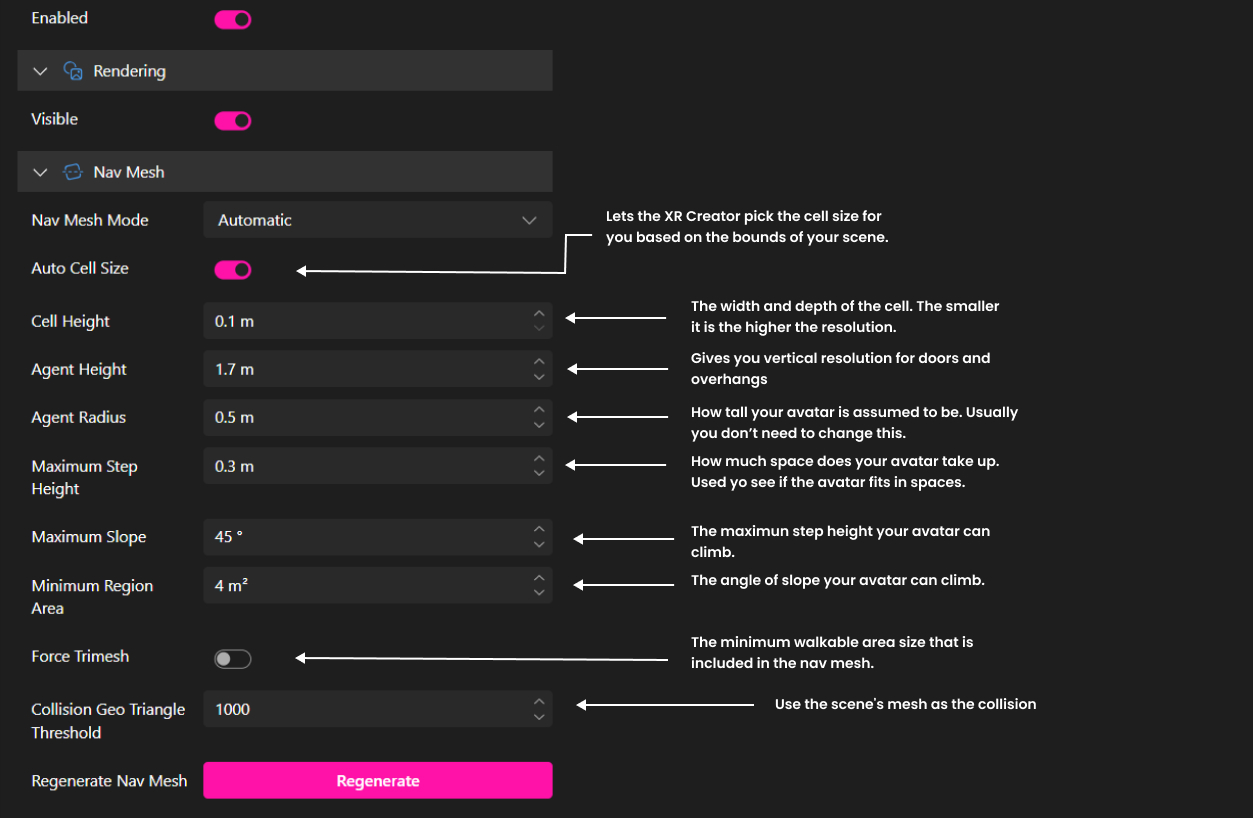
Key Nav Mesh Parameters

| Setting | Effect |
|---|---|
| Cell Size & Height | Defines the resolution of the voxelization. Smaller values improve accuracy but increase processing time. |
| Agent Radius | Determines how wide a character must be to fit through a path. Reduce this if narrow walkways are inaccessible. |
| Agent Height | Defines the minimum height avatars need to pass through an area. Lower this to fit through smaller doorways. |
| Max Step Height | Sets the maximum step avatars can climb (useful for stairs and small obstacles). |
| Max Slope | Determines the steepest slope avatars can walk up. Increase for hilly terrains. |
| Minimum Region Area | Controls the smallest navigable area. Small platforms may not be walkable unless this is reduced. |
🔹 Pro Tip:
- If a walkway is inaccessible, reduce the Agent Radius or adjust step height/slope settings.
Custom Nav Mesh Creation
If the auto-generated Nav Mesh does not work correctly, you can create a custom Nav Mesh using Blender:
How to Create a Custom Nav Mesh:
- Create a simplified version of your environment in Blender.
- Import it into XR Creator Studio as a separate model.
- Mark it as walkable and disable walkability on the original geometry.
🔹 Pro Tip:
- For minor fixes, use Box Colliders to manually define walkable areas.
Collision Mesh Generation
For collisions, XR Creator Studio provides two methods for generating a collision mesh:
| Method | Description |
|---|---|
| Trimesh | Combines all collidable meshes into a single mesh. More detailed, but may affect performance. |
| Heightfield | A simplified collision mesh that works well for outdoor terrains. Does not work well with walls, overhangs, or multi-level environments. |
The Heightfield divides the scene into a 2D grid, calculating the height at the center of each cell. This creates a draped effect, similar to a cloth over terrain.
📌 Limitations of Heightfield:
- Works well for outdoor terrains.
- Struggles with walls, overhangs, and multi-level buildings.
🔹 Pro Tip:
🔹 If your trimesh collision mesh is too dense, it can impact performance. Consider using Box Colliders instead.
Using Box Colliders for Manual Fixes
Box colliders can be added manually to fix collision issues:
- Add a Box Collider from the Elements Panel.
- Adjust its size and position to match the area needing a collision fix.
- Set the collider to "Walkable" or "Non-Walkable" depending on its function.
🔹 Pro Tip:
🔹 Use Box Colliders to fix small areas without affecting the entire collision mesh.