AI Integration in the Metaverse with XR Creator Studio
The AI Integration Microservice provides a centralized solution for connecting AI agents in the metaverse to providers such as OpenAI and Azure AI.
To build an AI-powered agent in XR Creator Studio, you’ll need to connect a supported AI model (from OpenAI or Azure) by configuring the API key, assistant ID, or endpoint.
What is an AI Agent?
An AI Agent is a configurable digital entity powered by a language model (like OpenAI or Azure AI) that can interact with users in immersive environments such as the metaverse. Its core components include:
- Model: The underlying AI engine (e.g., GPT-4, GPT-3.5) that drives its intelligence.
- Memory: Determines whether the agent retains conversation history temporarily (volatile) or across sessions (persistable).
- Interaction Instructions: Custom system prompts that define the agent’s personality, role, and behavioral constraints, like “You are a helpful assistant specializing in company products.”
AI Agent Examples
ChatGPT (OpenAI): A versatile conversational agent used for writing, coding, research, and general assistance.
Google Bard (Gemini): A chatbot focused on creativity, productivity, and real-time information retrieval.
Meta AI (Facebook): Integrated into Messenger and Instagram, offering smart replies, search, and recommendations.
Microsoft Copilot: Agents Embedded in Microsoft 365 apps like Teams, Outlook, and Word. These agents assist with tasks like summarizing emails, drafting documents, generating reports, and automating workflows2.
FinBot: A financial assistant that helps users manage budgets, track expenses, and understand financial products.
Using Completion vs Assistant
The choice between them depends on your project’s needs—whether you want fast, lightweight interactions or a more robust, context-aware assistant.
Completion-Based Agents
These rely on prompt-response interactions. You provide a system prompt, and the model generates replies. Ideal for lightweight, reactive agents with optional memory.Assistant-Based Agents
Built using OpenAI’s Assistant API, these agents support advanced features like file search, persistent memory, and tool integration. Best suited for complex tasks requiring deeper context and continuity.
Supported Agent types
XR Creator Studio supports three distinct types of AI Agents, each integrated through a different method and offering unique capabilities:
Azure AI Completion Agent
Connects via an endpoint and API key. Offers voice options, proximity detection, and event triggers.OpenAI Completion Agent
Uses OpenAI’s API and model name. Supports volatile or persistable memory, voice synthesis, and scripting events.OpenAI Assistant Agent
Built with OpenAI’s Assistant API. Allows file uploads and tool usage, enabling deeper contextual understanding and long-term memory.
Create an AI Agent with Azure AI Completion
Step 1: Find the API Key and Endpoint in Azure OpenAI Playground
- Visit: https://oai.azure.com/portal (Or go to the Azure portal, navigate to your OpenAI resource, and click "Playground" in the sidebar.)
Step 2: Open the Playground Settings
- In the top-right corner of the Playground, click the "View Code" button.
- This opens a panel showing how to call the current model via API.

Step 3: Get Your Endpoint and API Key
The Endpoint and Key field represent the secret tokens used to authenticate your API requests to the Azure OpenAI service.
In the View Code panel, locate the endpoint URL and Key:
Endpoint: The full URL that your application uses to send requests (including the deployment name and API version).
Key: A sensitive API key used to authorize those requests.
Example of Endpoint Usage (for Completions)
Replace <your-resource-name> and <deployment-id> with your actual values in the following format:
https://<your-resource-name>.openai.azure.com/openai/deployments/<deployment-id>/completions?api-version=2023-05-15
Step 4: Find the Deployment Name
- At the top of the Playground, check the Model dropdown.
- The selected value is your Deployment ID (e.g.,
gpt-35-turbo). - This should match the deployment name used in your endpoint URL.
Step 5: Integrate Your Azure AI Agent with XR Creator Studio
Once you’ve set up an Azure AI assistant, you can integrate it into your XR project.
1. Add an AI Agent Element in XR Creator
- Open your project in the XR Editor.
- In the Elements Menu, select AI Agent.
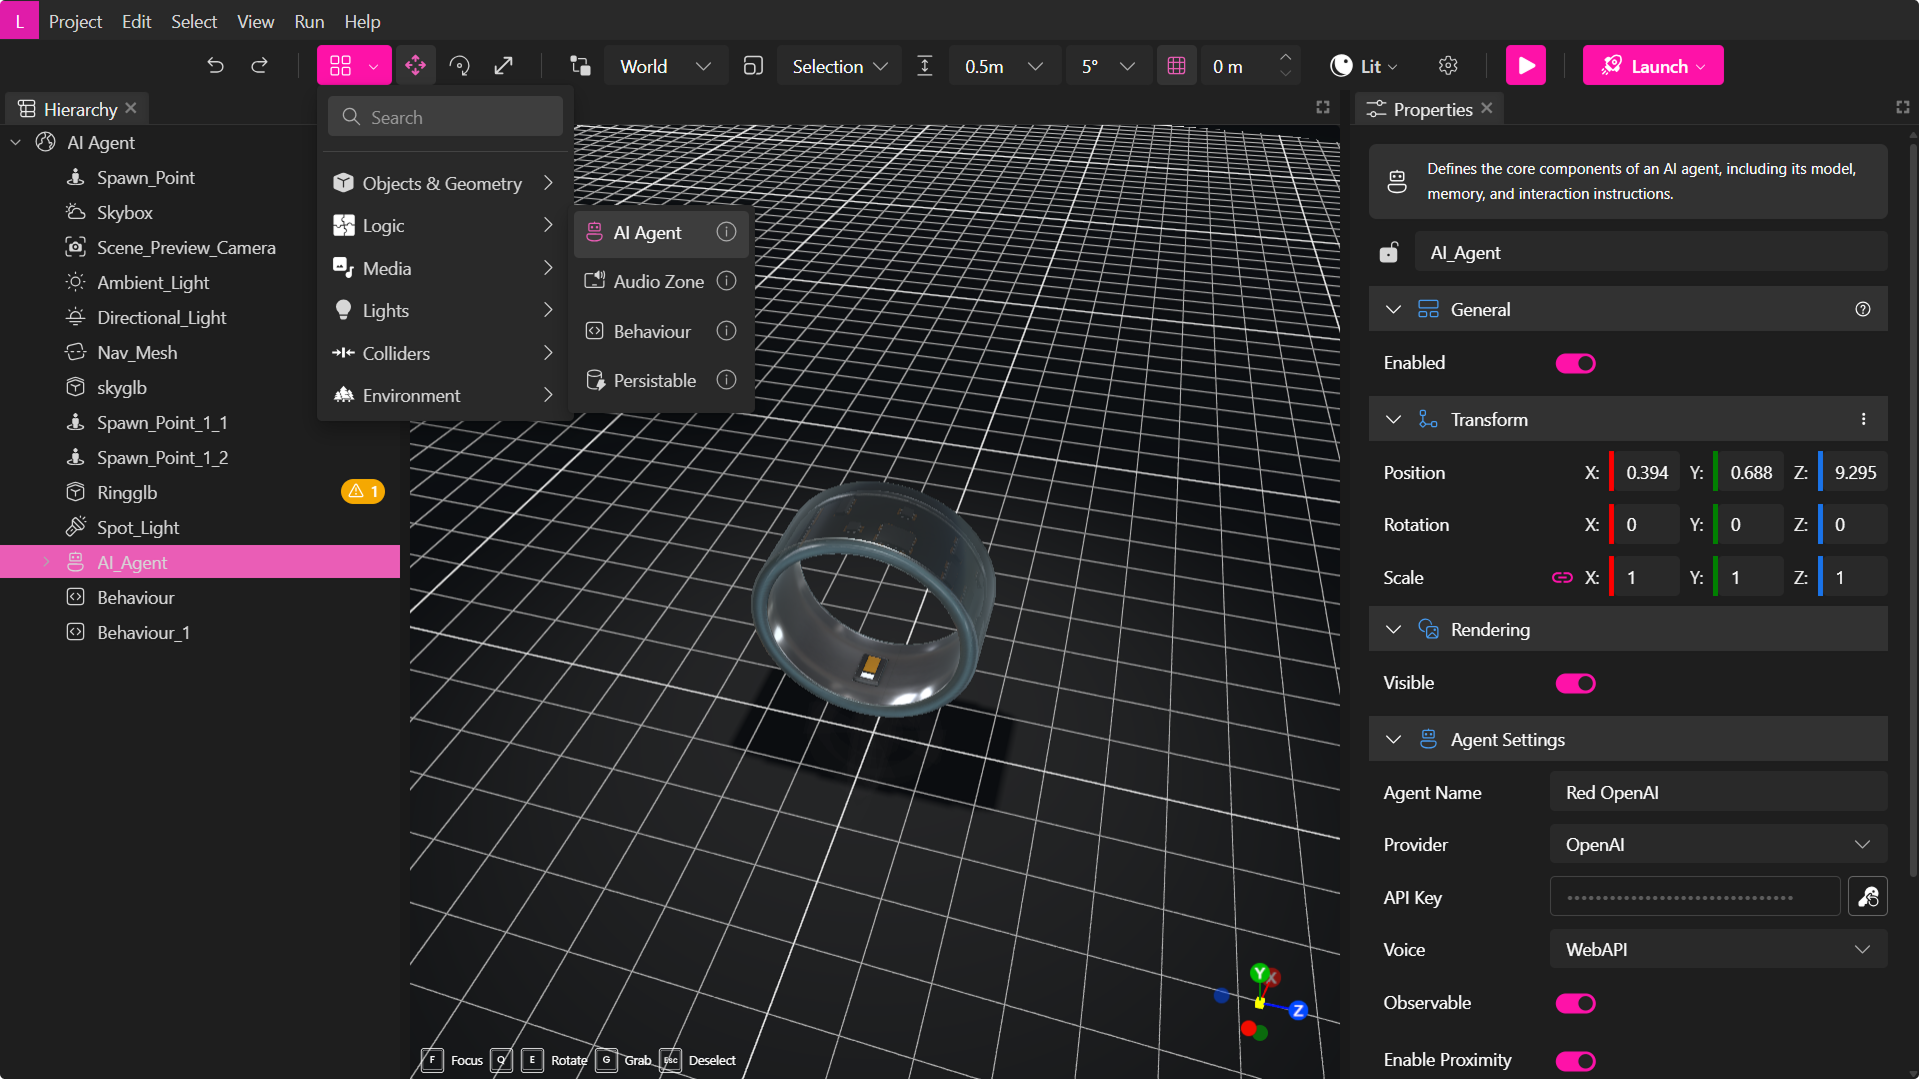
2. Configure AI Agent Properties to Connect to Azure AI
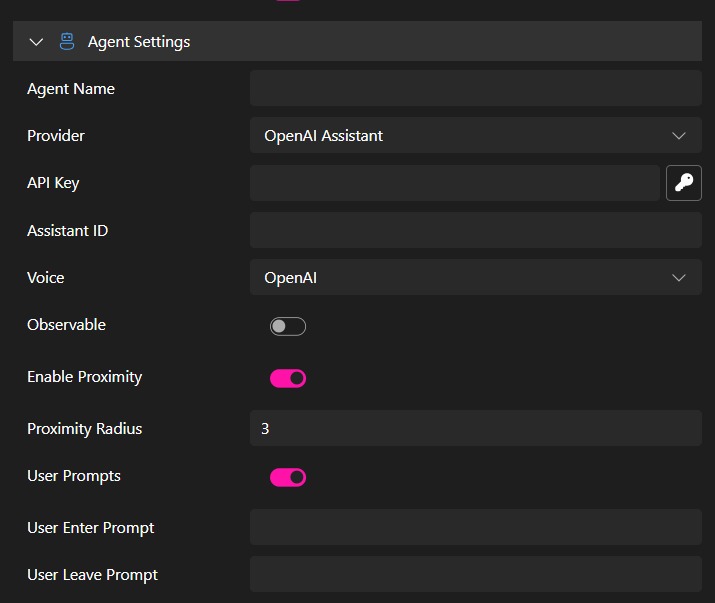
In the Properties Panel, you can set parameters to connect your AI Agent.
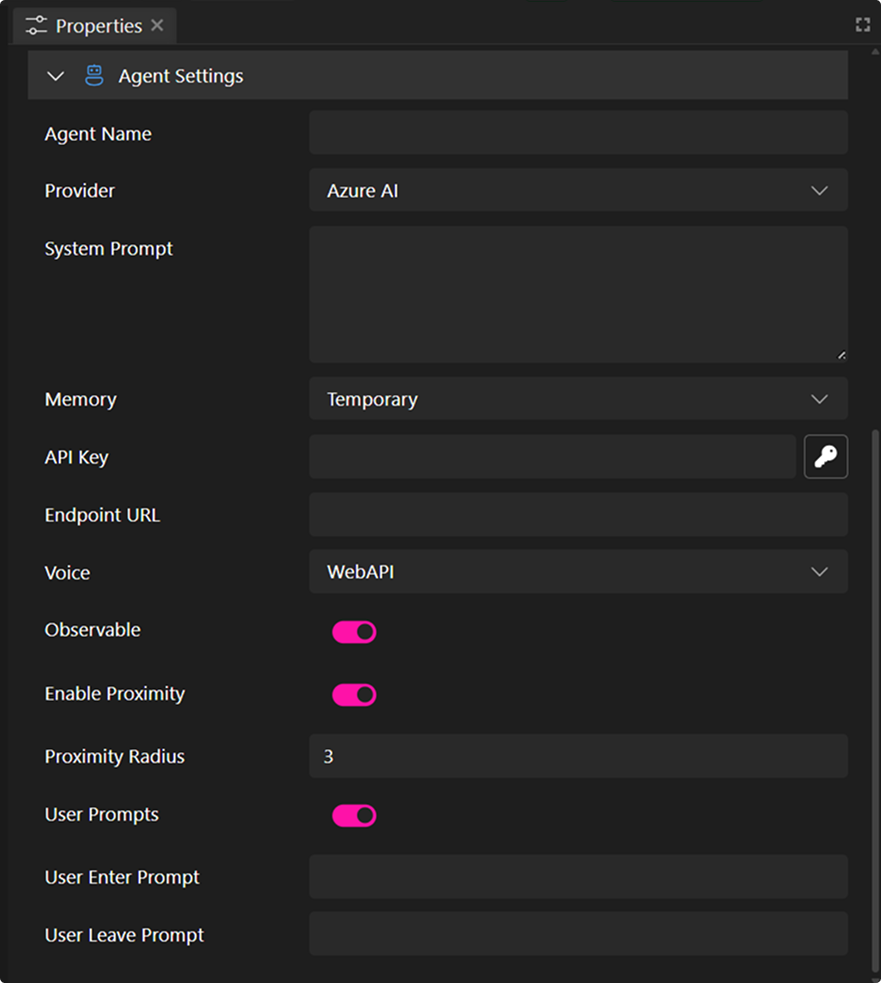
- Agent Name: This name will appear in the chat interface.
- Provider: Select the AI service. In this case, select the Azure AI Completion option.
- System Prompt: Instructions defining the AI's role, personality, or constraints (e.g., "You are a helpful assistant specializing in company products."). Max length ~4000 characters. This field is optional.
- Memory: Defines the type of memory your completion agent can use. By default, it operates with temporary volatile memory, meaning the agent retains chat history only during your session. Once you leave, the memory is erased. Alternatively, you can enable persistable memory, allowing the agent to maintain chat history across sessions.
- API Key: Enter your secret API key securely.
- Endpoint: (Required for Azure AI provider) The specific endpoint URL for your Azure OpenAI deployment. Which you can find in the Playground.
- Voice Options:
- WebAPI – Uses browser-based text-to-speech (varies by browser).
- Silent – The agent will only communicate via text chat.
- Observable (Emit Events): Enable this option to trigger in-world scripting events. These are especially useful when working with our Scripting API. See more in the AI Agent Event System guide.
- Enable Proximity: The agent can detect when a user enters or exits a defined range.
- Proximity Radius: Sets the distance (in meters/units) around the agent where proximity events (like user-enter or user-leave) are triggered.
- User Prompts: Enable this to allow the agent to show custom messages when users enter or leave its proximity.
- User Enter Prompt: The message the agent will say or display when a user enters the defined proximity radius.
- User Leave Prompt: The message the agent will say or display when a user exits the proximity radius. Only the API Key and the endpoint are not optional. Once your properties are set up, you can publish your project and have a fully functional Agent.
- User Prompts: Enable this to allow the agent to show custom messages when users enter or leave its proximity.
- Proximity Radius: Sets the distance (in meters/units) around the agent where proximity events (like user-enter or user-leave) are triggered.
Create an AI Agent with OpenAI Completion
Follow these steps to set up an Agent with OpenAI completion.
Step 1: Create an OpenAI Account
- Visit the OpenAI Signup Page and register an account.
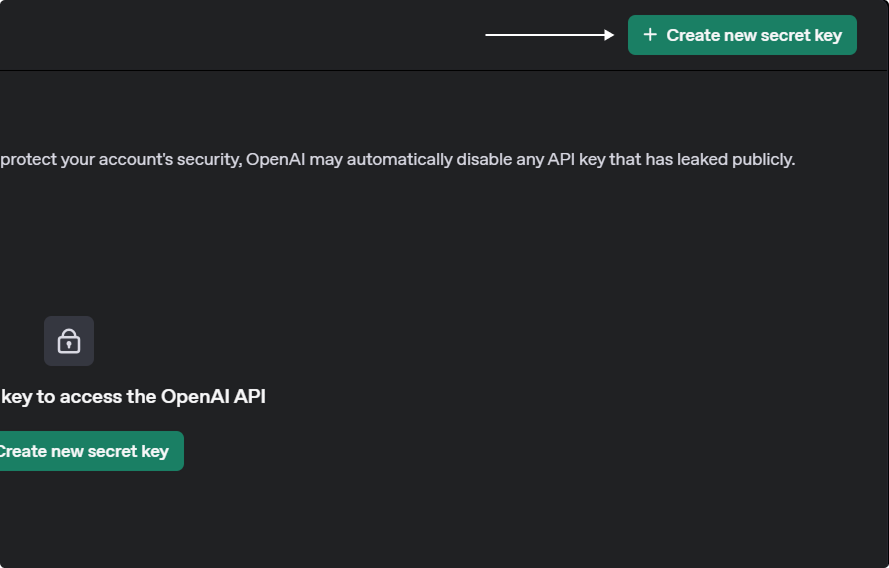
Step 2: Generate an OpenAI API Key
- Go to the OpenAI Dashboard.
- Navigate to the API Keys Section.
- Click Create new secret key.
- Provide a name tag, select a project, and set security permissions.
- Copy and store your API key safely, as it will not be shown again.
Once you’ve set up an OpenAI assistant, you can integrate it into your XR project.
Step 3: Integrate Your OpenAI Agent with XR Creator Studio
1. Add an AI Agent Element in XR Creator
- Open your project in the XR Editor.
- In the Elements Menu, select AI Agent.
2. Configure AI Agent Properties
In the Properties Panel, you can set parameters to connect your assistant.
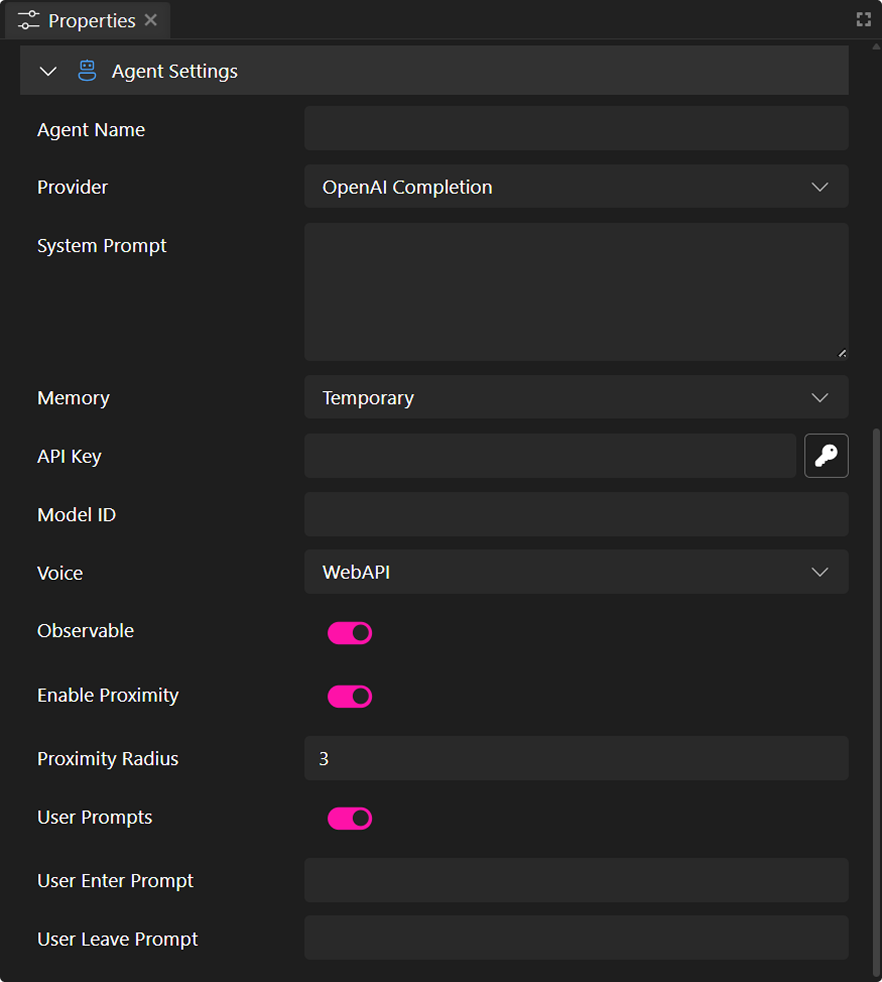
- Agent Name: This name will appear in the chat interface.
- Provider: Select the AI service, in this case, OpenAI Completion.
- System Prompt: Instructions defining the AI's role, personality, or constraints (e.g., "You are a helpful assistant specializing in company products."). Max length ~4000 characters. This field is optional.
- Memory: Defines the type of memory your completion agent can use. By default, it operates with temporary volatile memory, meaning the agent retains chat history only during your session. Once you leave, the memory is erased. Alternatively, you can enable persistable memory, allowing the agent to maintain chat history across sessions.
- API Key: Enter your secret API key securely.
- Model Name: (Required for OpenAI Completion provider) The specific OpenAI model to use (e.g., gpt-3.5-turbo, gpt-4, etc).
- Voice Options:
- OpenAI – Uses OpenAI’s voice generation.
- WebAPI – Uses browser-based text-to-speech (varies by browser).
- Silent – The agent will only communicate via text chat.
- Emit Events: Enable this to trigger in-world scripting events.
- Observable (Emit Events): Enable this option to trigger in-world scripting events. These are especially useful when working with our Scripting API. See more in the AI Agent Event System guide.
- Enable Proximity: The agent can detect when a user enters or exits a defined range.
- Proximity Radius: Sets the distance (in meters/units) around the agent where proximity events (like user-enter or user-leave) are triggered.
- User Prompts: Enable this to allow the agent to show custom messages when users enter or leave its proximity.
- User Enter Prompt: The message the agent will say or display when a user enters the defined proximity radius.
- User Leave Prompt: The message the agent will say or display when a user exits the proximity radius.
- User Prompts: Enable this to allow the agent to show custom messages when users enter or leave its proximity.
- Proximity Radius: Sets the distance (in meters/units) around the agent where proximity events (like user-enter or user-leave) are triggered.
Only the OpenAI API Key and the Model ID are not optional. Once your properties are set up, you can publish your project and have a fully functional Agent.
Set Up an AI Agent Using OpenAI Assistants
Follow these steps to set up an assistant in OpenAI to power your AI agent in the metaverse. This approach allows you to upload files, enhancing your assistant's knowledge and contextual understanding.
1. Create an OpenAI Account
- Visit the OpenAI Signup Page and register an account.
2. Generate an OpenAI API Key
- Go to the OpenAI Dashboard.
- Navigate to the API Keys Section.
- Click Create new secret key.
- Provide a name tag, select a project, and set security permissions.
- Copy and store your API key safely, as it will not be shown again.
3. Create an Assistant
- Open the Assistant Page.
- Click Create to start a new assistant.

- Enter a name and provide system instructions (up to 256,000 characters).
- Upload necessary files for the assistant’s knowledge base.
- Enable the File Search tool for retrieving information.
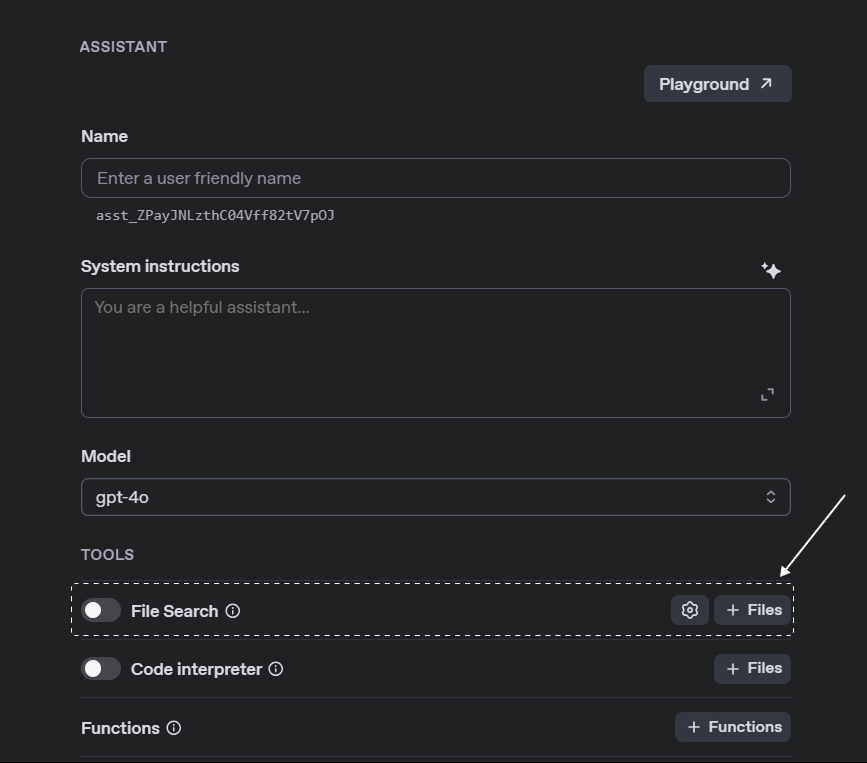
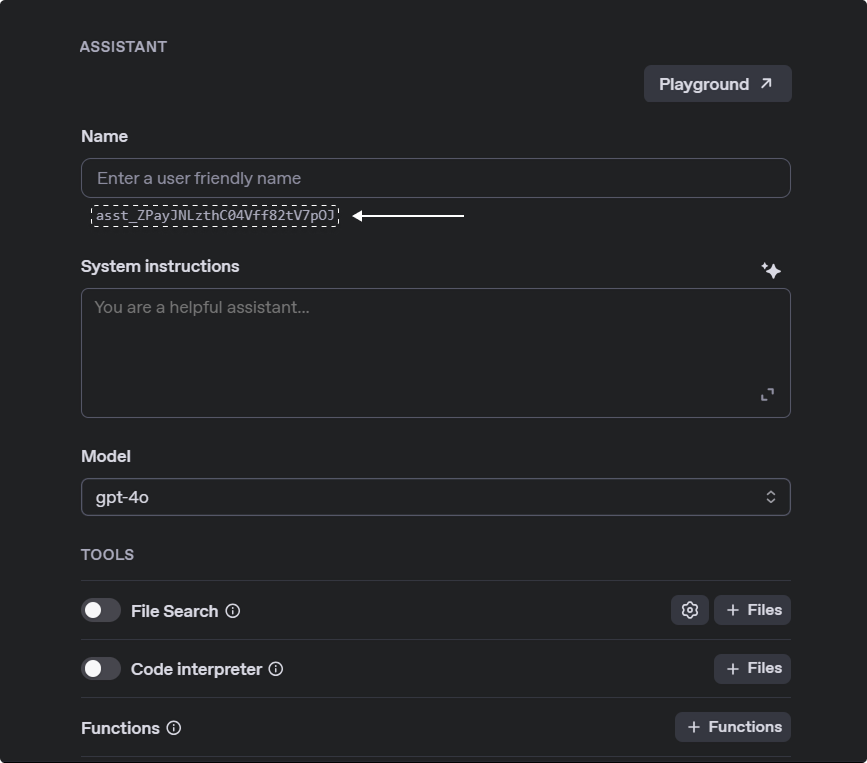
- Copy the Assistant ID for future use, you can find it below the name of your assistant.
Step 4: Integrate Your OpenAI Assistant with XR Creator Studio
Once you’ve set up an OpenAI assistant, you can integrate it into your XR project.
1. Create an AI Agent in XR Creator
- Open your project in the XR Editor.
- In the Elements Menu, select AI Agent.
2. Configure AI Agent Properties
In the Properties Panel, you can set parameters to connect your assistant.
- Agent Name: This name will appear in the chat interface.
- Provider: Select the AI service. In this case, OpenAI Assitant.
- OpenAI API Key: Enter your secret API key securely.
- Assistant ID: This is the unique identifier (
asst_...) from OpenAI. Which you can find in the Assistant page. - Voice Options:
- OpenAI – Uses OpenAI’s voice generation.
- WebAPI – Uses browser-based text-to-speech (varies by browser).
- Silent – The agent will only communicate via text chat.
- Observable (Emit Events): Enable this option to trigger in-world scripting events. These are especially useful when working with our Scripting API. See more in the AI Agent Event System guide.
- Enable Proximity: The agent can detect when a user enters or exits a defined range.
- Proximity Radius: Sets the distance (in meters/units) around the agent where proximity events (like user-enter or user-leave) are triggered.
- User Prompts: Enable this to allow the agent to show custom messages when users enter or leave its proximity.
- User Enter Prompt: The message the agent will say or display when a user enters the defined proximity radius.
- User Leave Prompt: The message the agent will say or display when a user exits the proximity radius.
- User Prompts: Enable this to allow the agent to show custom messages when users enter or leave its proximity.
- Proximity Radius: Sets the distance (in meters/units) around the agent where proximity events (like user-enter or user-leave) are triggered.
Only the OpenAI API Key and the Assistant ID are not optional. Once your properties are set up, you can publish your project and have a fully functional Agent.
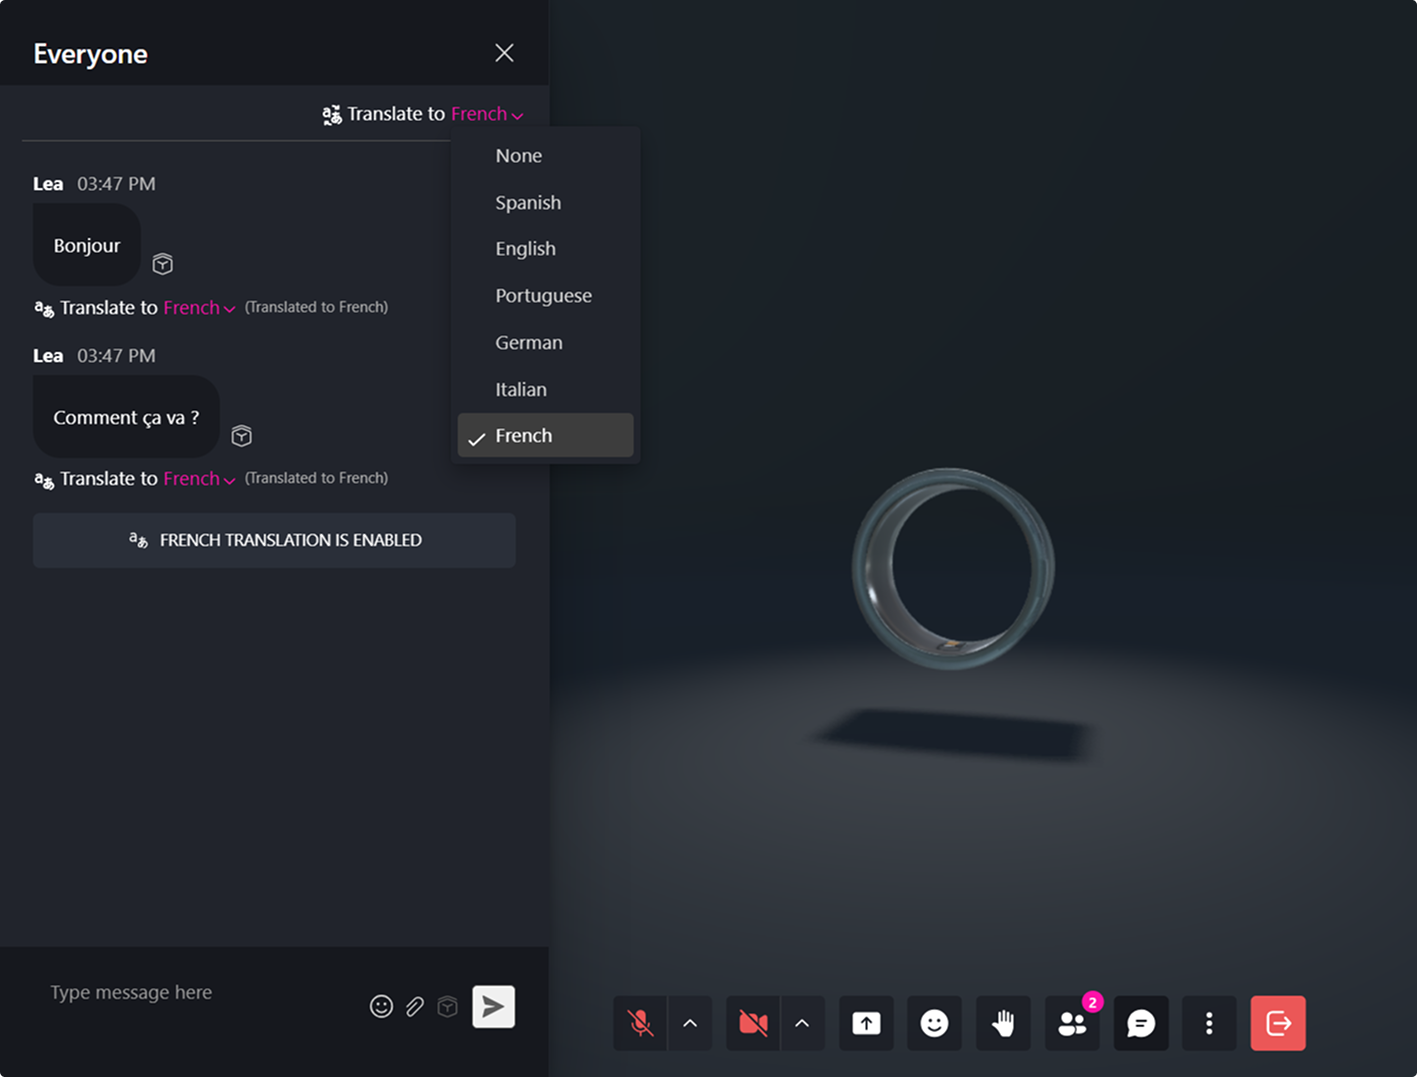
Create a Translation Agent for the Chat
A Translation Agent enables real-time chat translation within the Metaverse, allowing users who speak different languages to communicate during live interactions.
Follow the steps below to create and integrate your Translation Agent.
Step 1: Create an OpenAI Account
- Visit the OpenAI Signup Page.
- Register a new account or log in if you already have one.
Step 2: Generate an OpenAI API Key
- Go to the OpenAI Dashboard.
- Navigate to the API Keys section.
- Click Create new secret key.
- Provide:
- A name tag for your key
- The appropriate project
- The required security permissions
- Copy and securely store your API key.
⚠️ Important: Your secret API key will only be shown once. Make sure to save it in a secure location.
Step 3: Integrate Your Translation Agent in XR Creator Studio
1. Add an AI Agent Element
- Open your project in the XR Editor.
- In the Elements Menu, select AI Agent.
- Add the AI Agent element to your scene.
2. Configure AI Agent Properties
Open the Properties Panel of your Agent:
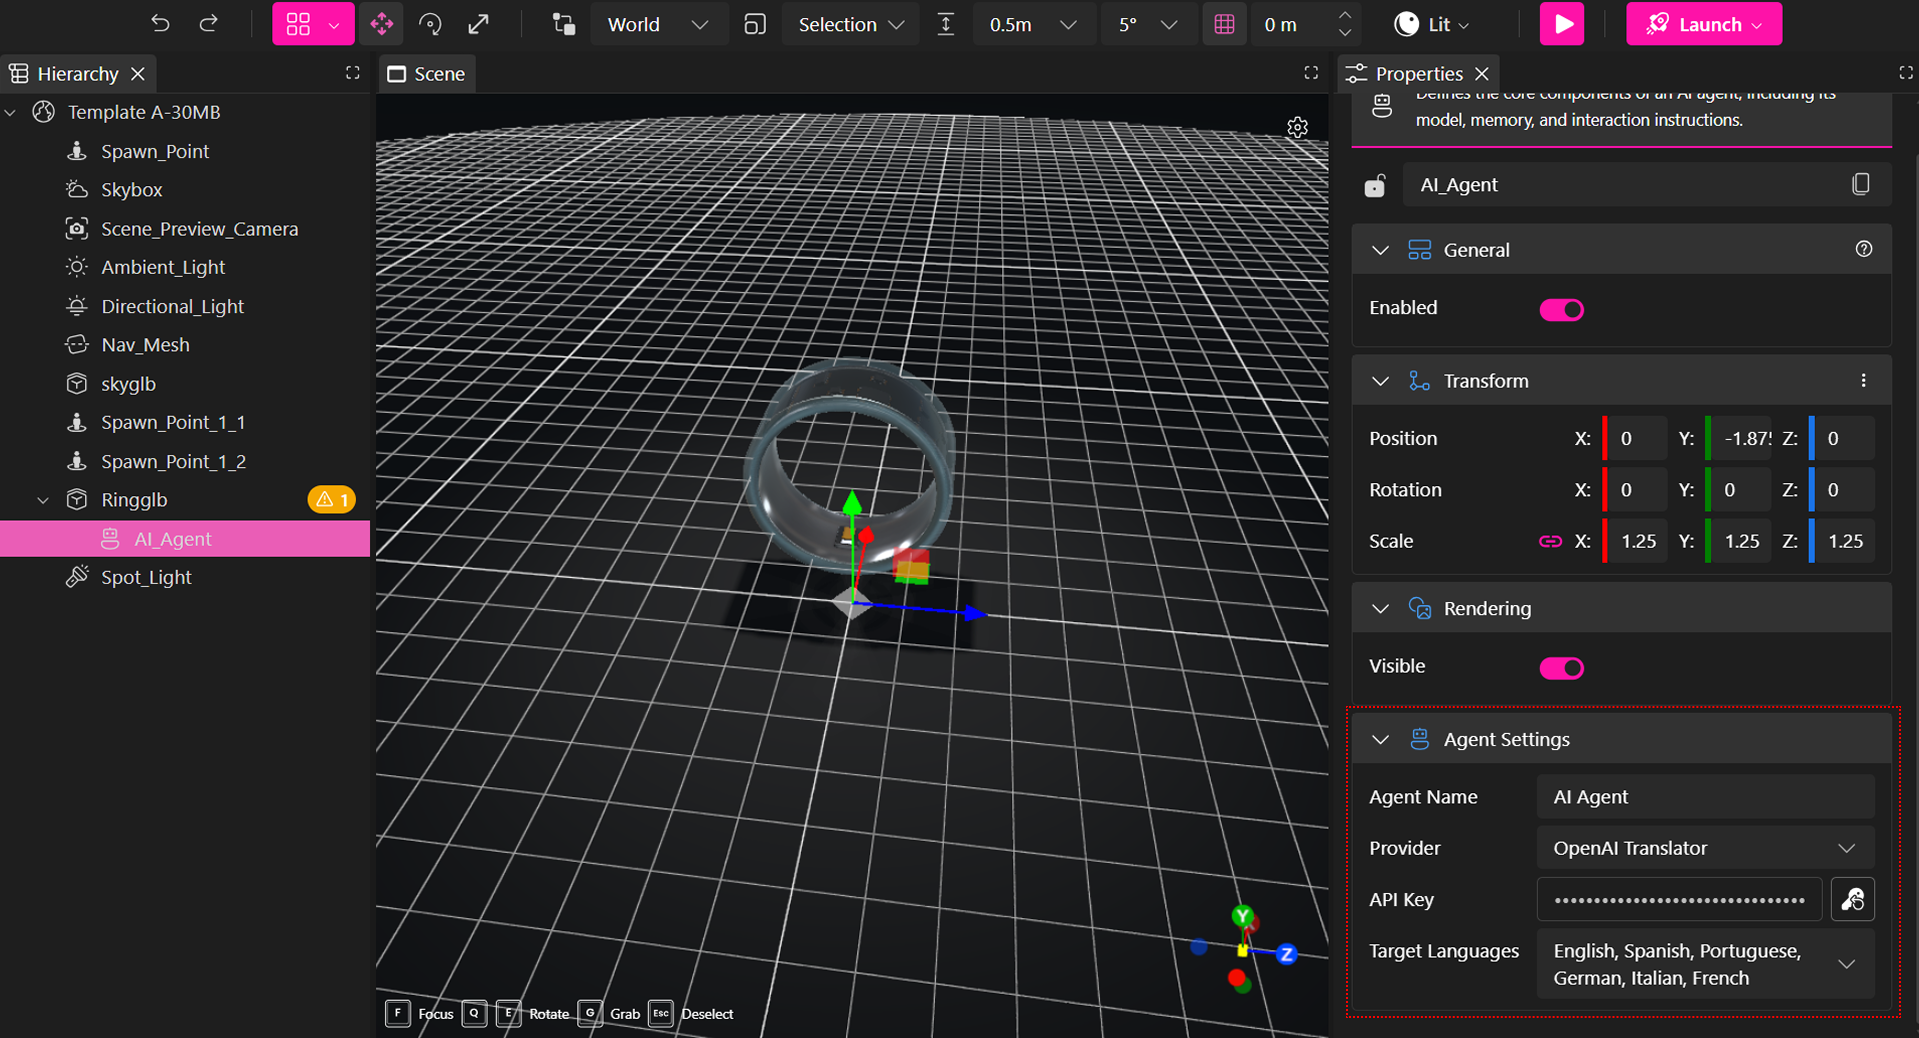
To configure your agent, fill the following inputs:
Agent Name: The name that will appear in the chat interface.
API Key: Paste your secret secret API key securely.
Target Languages: Select one or multiple languages the agent will translate messages into.
The agent will automatically detect the original message language and provide translations in the selected target languages.
Final Step: Publish Your Project
- Save your changes.
- Publish your project.
Your Translation Agent will now be fully functional and ready to translate chat messages in real time within the Metaverse.
Enable Persistable Memory for Completion Agents
You can enable persistable memory for your agent, allowing it to retain chat history across conversations.
To do this, select a Persistable element from the elements dropdown, which will automatically add it to the hierarchy panel.
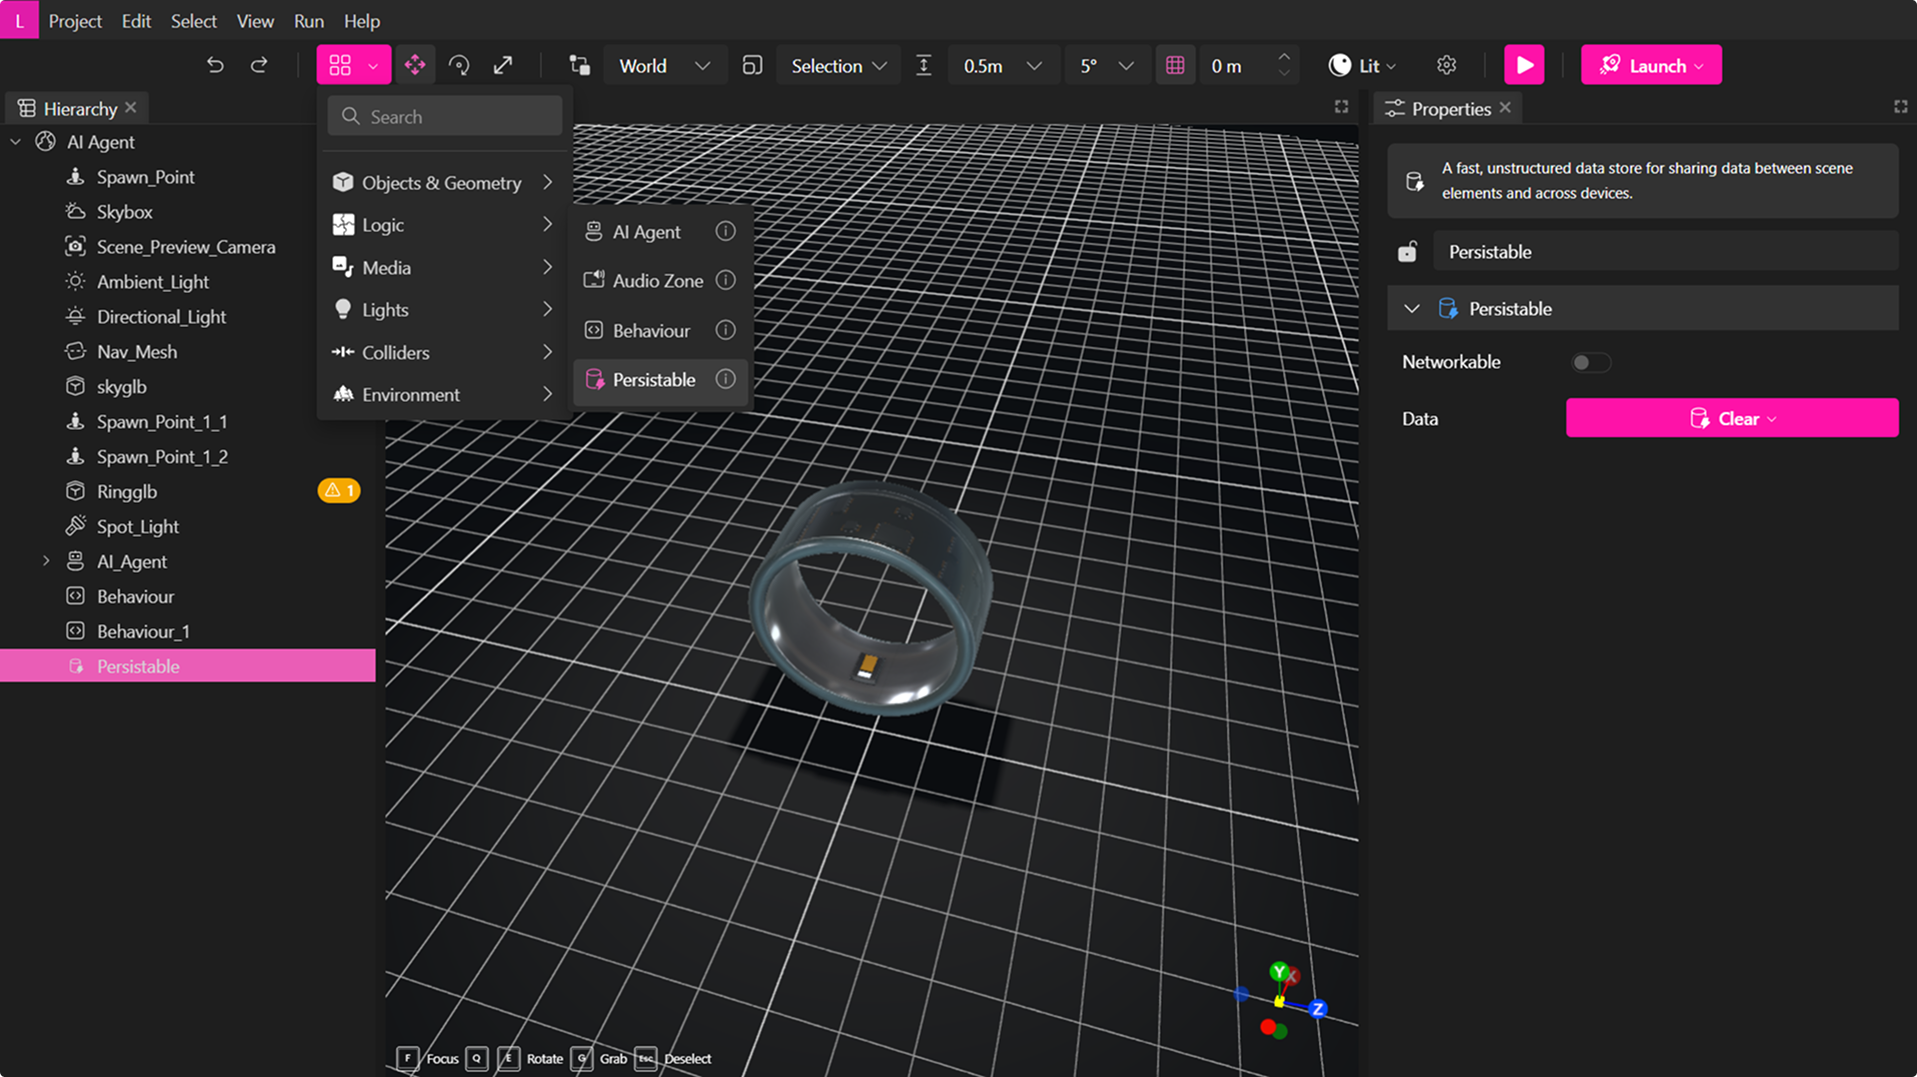
Next, in the agent's properties, choose the newly created persistable from the dropdown menu, then publish the verse.

This ensures your agent maintains conversation context and memory across sessions.
AI Agent Event System
When Emit Events is enabled, the AI Agent can trigger various interactions:
| Event | Description |
|---|---|
user-enter | Triggered when a user user enters the proximity region of the agent. This event is dispatched only if ‘Emit events’ is enabled and ‘Enable proximity’ is activated in the AI Agent component. |
user-leave | Triggered when a user leaves the AI Agent’s proximity region. It is dispatched if 'Emit events' is enabled and ‘Enable proximity’ is being used. |
agent-talk-start | Emitted when the agent begins speaking. When the audio is played with the play button, it is also emitted whenever the voice synthesis sequence starts. |
agent-talk-talking | Dispatched during the agent's speech in each frame, sending the modulated amplitude of the sound wave. When subscribed to this event, the sound wave arrives as a float value as a parameter of the event handlers, amp is similar to the value used in MUDz for the scale animation of avatars when they speak. Here, we would take it to send the audio value of the agent speaking. |
agent-talk-end | Triggered when the agent finishes speaking. |
agent-thinking | Dispatched when the agent is thinking, i.e., when the dots are shown in the chat. |
These are especially useful when working with our Scripting API.
Make sure the Observable option is enabled so these corresponding in‑world scripting events can execute properly.